Showing posts with label Stencil. Show all posts

Saturday, October 17, 2026

Spellbinders - Scenic drive birthday 2

 Happy Saturday,

Today I have Mark's birthday card to share using the 6 layer stencil from Spellbinders called Scenic Drive, which creates the sky, clouds, sun, trees and ground.  This one has a 30-piece muscle car added to the front, rather than a sentiment.  
I used PTI Spring Rain and Blueberry Sky inks for the sky, Terracotta Tile, Melon Berry and Bright Buttercup for the sun, Ripe Avocado and New Leaf for the trees and Fine Linen, Kraft and Dark Chocolate for the ground.  The inks were applied using the multi-step stencil and blending brushes to create this great retro-graphic scene.  For the puffy clouds are used Light Fluffy Paste for some texture.

I cut the stenciled image and Black mat out using DieNamics Circle STAX Set 1.  I made this card a square card 5.25" square.  I continued part of the sky pattern and ground from the image with Blueberry Sky and Kraft cardstock.

The muscle car is a 30-piece die. The car body is PTI Americana. Bumper, grill, headlight trim, rearview mirror, side mirror, steering wheel, hubcaps, door handle are metallic silver cardstock.  Main Wheels, interior are PTI Smokey Shadow.  Tread of the wheels, bench seat and racing stripes are PTI True black.  Headlights in golden yellow and blinker lights in orange.  It was a lot of die cuts and gluing but quite the car when finished.

Thanks for stopping by...
Blessings,
Deb

Saturday, July 4, 2026

Unity - Cheesy Birthday


Happy Saturday!

Today, I have another birthday card using a super punny stamp set from Unity Stamps called "Cheese Chat".  I thought this would be a funny card for family and friends who live outside Wisconsin.  

I recently cleaned my craftroom and discovered cardstock on my shelf that I had forgotten was there because there were boxes in front of it.  It was the smooth Bazzill cardstock The Angel Company carried the last year or so, which means it has been on my shelf over 15 years.  Can that be possible?  

I found from yellow Bazzill Grapefruit Bliss and created a stenciled background, which looks like cheese.  The stencil was one I got in a set from Amazon several years ago.  The ink I used was PTI Summer Sunrise.  I've seen card samples with a partially stenciled background that fades out, so I thought I would give it a try.  The sentiment is stamped on Pineapple Bliss Bazzill cardstock and cut with DieNamics Circle STAX Set 1 & 2.  Matted the sentiment and the background with PTI Black cardstock.  

The Cheese and grater image was colored with Copic Markers.
Copic Colors:  Y17, Y21, Y38, E31, E33, E37, W1, W3, W4, R39

I cut the colored image with a edge die from DieNamics - Stitched Basics Edges.  I'm finding all kinds fun of things in my craftroom. 

Thanks for stopping by...
Blessing,
Deb

Saturday, May 9, 2026

Unity - Peony Mother's Day

Happy Saturday!

With Mother's Day tomorrow, I have this years Mother's Day card to share today.  I used a Stamp and layered Stencil from Unity called Peony.  

I saw this card layout on Facebook with large flowers in the lower left and upper right corners with an embossed background.  It was the inspiration I needed to use some pieces I had sitting on my desk.   

I had the Spellbinders Tufted 3D embossed panel in my stash.  I created it when I got the folder so I could see when it was like.  
I actually bought the stencil first, there were several sample cards with a white outline so I thought they only used the stencil.  I just could not get it to look right, although I think I used watercolor paints, that could have been my problem.  So, I bought the coordinating stamp set and die when they were on sale.  When I got the Peony stamp and die, I tried it out, stamping the flower cluster on some white cardstock and colored it using the multi-layer stencil.  

The stencil is on 1 large mylar sheet but has 3 steps for the flower and 2 steps for the leaves.  I used PTI Sweet Blush (upper left), Pale Peony (upper middle) and Hibiscus Burst (upper right) ink and blending brush for the flower petals.  The leaves were colored with PTI Green Parakeet and New Leaf ink. The center of the flower was colored with markers. Then, I die cut the colored image.  And there the colored peony images sat for several months on my desk.

One colored image was used for the card, which was the clever part of the layout.  I mounted the larger bloom in the lower left hand corner of the embossed panel (3.75 x 5") with pop dots, the bud is in the corner, then trimmed it.  The medium bloom was mostly cut off and this remanent was used in the upper right corner and trimmed.

I matted the image panel on 4" x 5.25" PTI New Leaf cardstock.  The base card (4.25 x 5.5" folded) is PTI white cardstock.  The sentiment is a Spellbinders stamp set "Sentiments to you". The Happy Mother's Day was stamped on white cardstock and cut with a Spellbinders circle die and matted with a PTI New Leaf circle and added to the front of the card. 

A bright and cheery Mother's Day card.  
It would make a great birthday card too.

Thanks for stopping by...
Blessings,
Deb
 

Saturday, March 21, 2026

Unity - Level Up Birthday

Happy Saturday!

Today I have a birthday card I made for our nephew who turned 40 this week.  I thought this stamp set from Unity - Level Up was perfect.  I remember getting him Gameboy games for his birthday 25-30 years ago, so this image had all the nostalgia along with a fun gaming sentiment. 

I stamped the Loading image on white cardstock then used DieNamics - Stitched Basics Edges die to create the angle cut.  Used a stitch banner die for the sentiment.  I added a stenciled chevron in Soft Stone ink to the white cardstock.  The Gameboy image was colored with Copic Markers and fussy cut out and adhered to the front panel with pop dots.  The base card is white.  I added a piece of blue Bazzill cardstock, then added the white front panel with the image and sentiment.

The second card uses the same layout and the gaming controller from the same stamp set. I fussy cut the controller out, so the plug was free and wrapped around the sentiment.  A fun detail I saw on a Unity card sample for this set.

Copic Colors:  B14, B16, Y32, Y35, R14, R46, W1, W2, W3, 0
Cardstock: Bazzill Loganberry Pie, PTI White
Ink: PTI Soft Stone

Thanks for stopping by...
Blessings,
Deb

Saturday, February 21, 2026

Spellbinders - Scenic Drive Birthday


Happy Saturday,

Today I have a stenciled card to share.  It uses a 6 layer stencil from Spellbinders called Scenic Drive, which creates the sky, clouds, sun, trees and ground.  
I used PTI Aqua Mist and Hawaiian Shores inks for the sky, Terracotta Tile, Melon Berry and Bright Buttercup for the sun, Ripe Avocado and New Leaf for the trees and Fine Linen, Kraft and Dark Chocolate for the ground.  The inks were applied using the multi-step stencil and blending brushes to create this great retro-graphic scene.  For the puffy clouds are used Light Fluffy Paste for some texture.

I cut the stenciled image and Black mat out using DieNamics Circle STAX Set 1.  I made this card a square card 5.25" square.  I continued part of the sky pattern and ground from the image with Aqua Mist and Kraft cardstock.

The script Happy die cut is from Memory Box and the birthday stamp is from Simon Says Stamp "Happy".  I used a lot of random dies from my stash.  I attended an online cardmaking summit focused on using what you have and it seems to have reminded me I have lots of great things I just need to use them.

Thanks for stopping by...
Blessings,
Deb

Sunday, December 14, 2025

Spellbinders Sprigs and Bow


Happy Sunday!

Today is day 4 of my 2025 Christmas card creations.  This card uses 
Spellbinders "Sprigs and Bows" stencil set, sadly it is no longer available.  There are 5 stencils and 1 mask in this set.  

I started with a 4.25 x 5.5" piece of PTI White cardstock.  First, I used the bow stencil with PTI Pure Poppy ink and applied the ink to the cardstock with a large blending brush.  Second step is to place the mask for the bow and ribbon over the inked area - very important to protect the bow just created. Third step is to use the leaf stencil and light green ink, I used PTI Prairie Grass to create the leaves.  Fourth step is to line up the stem stencil and use PTI Ripe Avocado ink to create the darker grean stems.  The Fifth step is to line up the stencil to add the red berries with PTI Pure Poppy ink.  Lastly, I removed the mask for the bow and above is the result.  I've never used a mask made from the same material as the stencil.  It worked really well, it allowed inking right up to the bow and ribbons. 

This card was labor intensive with all the stencils and the mask, but I was really happy with the result.  I cut the stenciled cardstock down to 4 x 5.2" and mounted it on a PTI Pure Poppy base card.  Then to finish the card I added a few red gems.

This card of the gift was the theme I went with this year for the inside verse for all my 2025 Christmas cards...

Wishing you joy and peace
as we celebrate the
beautiful gift of Jesus. 
A gift freely given to all people
to demonstrate God’s love,
grace and promise of eternal life,
through faith alone.

 Joyous Christmas Blessings

Thanks for stopping by...
3 more posts to go!
Blessings to you,
Deb
     

Saturday, December 13, 2025

Christmas Joy with Sprigs

 Happy Saturday!

Today is Day 3 of my 2025 Christmas card creations.  Last Saturday I had a card that used the In Love Arts Joy Nativity die and todays card uses it too.  The multilayered stenciled springs of holly background is what I'm going to talk about today.  This stencil set was a Spellbinders Stencil of the Month "Sprigs and Bow" in July 2024.  

Spellbinders usually makes their monthly subscription items available to everyone after a few months.  This set, unfortunately was on clearance in June when I bought it, so it isn't available anymore.  It came with 5 layering stencils and 1 mask for the bow.  I used the 3 stencils to create the sprigs and holly for this card.  

I started with a 4.25 x 5.5" white cardstock panel.  The 1st stencil makes the lighter green leaves, the ink I used was PTI Prairie Grass.  The 2nd stencil adds the stems, I used a darker green, PTI Ripe Avocado.  The 3rd stencil adds the holly berries, I used PTI Pure Poppy.   The ink was applied with a large blending brush.  I only used 2 blending brushes, one for the greens and another for the red ink.

The base cardstock is PTI Ripe Avocado.  I cut the stenciled panel down to 4" wide and adhered it to the base card on the right side.  I added the Joy Nativity panel just like last weeks card, with pop dots.  Then added a few red gems to finish the card.  

Thanks for stopping by...
Tomorrow, I show a card made with the springs and bow.
Blessings,
Deb

Saturday, August 23, 2025

Spellbinders - Cosmos Birthday

Happy Saturday!

Today, I have some birthday cards I made using Spellbinders Cosmos Backdrop and stencil bundle.  I found it on Amazon.  This background is so pretty and with the 4 layer coordinating stencils is so easy to color.  I made several color combinations and also played with the layout and the sentiment. The sentiment is from PTI stamp set Cut Away Tags - Summer.

The background is a BetterPress plate, which I inked with Memento Black ink and ran through my Spellbinder die cut machine to make the impression on PTI White cardstock.  I love the BetterPress plates for large backgrounds, gives a beautiful impression like it is printed.  Then, I colored the image using coordinating stencils.  

The inks used are all PaperTrey Ink - Flowers: Pale Peony and Berry Sorbet; Flower Center: Summer Sunset and Honey Nut; Leaves: Green Parakeet and Simply Chartreuse. 

The first card above is a pink-peach version.  The base card is Pale Peony with a True Black matted image in the upper right corner and matted sentiment in the center.

Card 2 - Teals
The inks used are all PaperTrey Ink - Flowers: Aqua Mist and Hawaiian Shores; Flower Center: Summer Sunset and Honey Nut; Leaves: Green Parakeet and Simply Chartreuse. 

The second card above is a teal version.  The base card is Aqua Mist with a True Black matted image centered and matted sentiment across center of the background.

Card 3: Purples
The inks used are all PaperTrey Ink - Flowers: Lilac Grace and Amethyst Allure; Flower Center: Summer Sunset and Honey Nut; Leaves: Green Parakeet and Simply Chartreuse. 

The third card above is a purple version.  The base card is Lilac Grace with a True Black matted image centered and matted sentiment at an angle across the background.

Card 4: Bright Pinks
The inks used are all PaperTrey Ink - Flowers: Lovely Lady and Raspberry Fizz; Flower Center: Summer Sunset and Honey Nut; Leaves: Green Parakeet and Simply Chartreuse. 

The fourth card above is a bright pink version.  The base card is Raspberry Fizz with a True Black matted image centered and matted sentiment flag added to the background.

Thanks for stopping by...
Blessings to you,
Deb

Saturday, December 21, 2024

Spellbinders - Gold Holly with Stencil coloring

Happy Saturday!

Today I have the third and last Christmas card to share using Spellbinders - Glimmer Holly Background.  I bought the bundle from Spellbinders, which had the hot foil plate and coordinating stencils for coloring the background.  For this card, I used gold foil on PaperTrey Ink white cardstock. 

I colored the holly and leaves using the 4 layer stencil, 3 stencils are different leaves and 1 for the berries.  I used inks from PaperTrey Ink, Green Parakeet, New Leaf; for the holly leaves I used 2 inks Prairie Grass and Olive Twist.  To color the berries, Autumn Rose and Scarlet Jewel.   

 The Merry Christmas die I found on Amazon and I liked that it was all one piece, even the dot of the i is part of the Merry swoosh.  I matted the gold Merry Christmas sentiment on a piece of vellum to help it from getting lost in the background.  I used glue to attach the sentiment to the vellum, then applied glue behind the die cut to attach the vellum to the base card.  I nice trick so no glue or tape shows thru the vellum.  The vellum is from PaperTrey ink.  

The base card is PTI Pure Poppy cardstock.  I also added a die cut poinsettia to this card, cut from pure poppy and gold cardstock.  The die has 5 pieces which I glued together to create the layered flower.  

I made some cards vertical and some horizontal.

I will have another Christmas card tomorrow.

Thanks for stopping by...
Blessings to you,
Deb

Saturday, June 15, 2024

Taylored Expressions - Swirly Rose Wedding


Happy Saturday!

Today, I have a wedding card I made for a friend at work using a stencil and die from Taylored Expressions. The stencil is Mini Slim Swirly Roses and I used blue-green and green inks for this card. This is a really a fun stencil that produces a pretty background in very little time. I added a bit of shimmer using Cosmic Glitter Kiss Frosty Sparkle.  

The Mr and Mrs die cut was also from Taylored Expressions. one of their Framed Script line, currently unavailable.  I backed the die cut with vellum paper.

PaperTrey Inks:  
Spring Moss, Ripe Avocado, 
Aqua Mist and Hawaiian Shores

PaperTrey ink Cardstock:
White
True Black

Cosmic Glitter Kiss

Thanks for stopping by...
Blessings to you,
Deb

Saturday, May 7, 2022

The Greetery - 2022 Graduation Card

Happy Saturday!

Today, I gave a graduation card to share.  This card started a whole obsession.  It all started when a craft company called The Greetery had this 2022 Graduation Bundle 50% off in April.  It was quite the bundle - sentiment stamps, die, hot foil plate and 3 stencils. The "Congrats, Grad" is from the sentiment stamp set, red is the die cut, the silver 2022 is done with a hot foil plate and the silver stars uses one of the stencils and silver embossing paste.

So, I received the bundle within a couple days and played the die cuts and stenciling...but the hot foil plate - I wasn't sure what to do with that plate.  I have the Spellbinders Platinum die cutting machine.  Spellbinders makes the Glimmer Hot Foil machine, so I ended up researching and purchasing it.  

I spent about a week watching how to videos on YouTube and taking notes on tips, techniques, the best cardstock to use and how to get great results. 

Hot foiling uses a combination of heat and pressure to transfer the foil to the cardstock.  The Glimmer machine has a base plate that you heat which replaces you normal die cut base.  You heat the metal plate on the glimmer base, add spellbinder foil, then your cardstock and 2 glimmer plates to the sandwich. Then run the heated sandwich through the Spellbinders Platinum die cut machine.  Here is a short video showing the Hot Foil process. 

My machine works great without extra cardstock shims or anything other than the plates provided.  Every machine is different, so I was excited I didn't have any experimentation...it just worked.  And...the obsession began.  

The cardstock recommended online is white Hammermill 110 lb cardstock.  It is not very expensive and works great for hot foil.  You need a very smooth cardstock for a good transfer.  I had already made the red die cut using PTI Pure Poppy cardstock.  It is a heavy and smooth cardstock, so just used it and it worked really well.  I have lots of PTI cardstock so I look forward to trying more colored cardstock in the future.  

I made quite a few cards using hot foil, which I will post in the coming months.  Next week, I will post the Mother's day card I made with a hot foil border and sentiment.

Until next week, thanks for stopping by...
Blessings,
Deb

Saturday, December 25, 2021

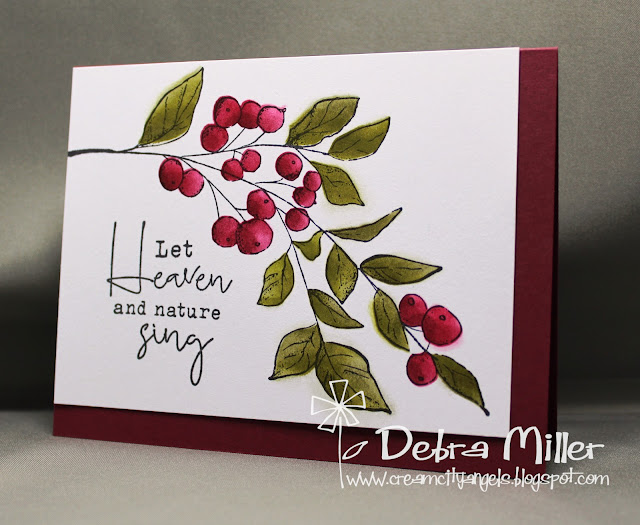
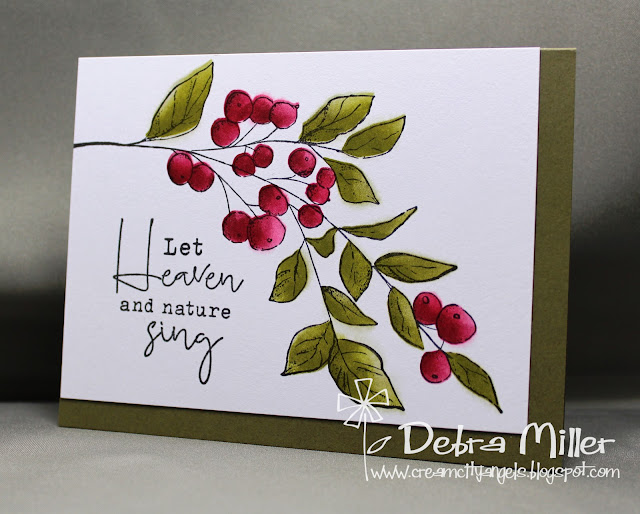
Taylored Expressions "Seasonal Sprig" Christmas

Merry Christmas!

Today I this year's Christmas card to share, using Taylored Expressions "Seasonal Sprig" stamp and stencil set.  I stamped the sprig first with black ink.  I used my We R Memory stamp press to position the large stamp and help create a production line for the 65 cards I sent out this year. 

The stencil really makes it so simple to color.  There are 2 full stencils one for the berries and another for the leaves.


I applied the color with blending brushes applying the lighter ink 1st filling in the image then coming back with the darker shade to add depth.  It went pretty quickly and is really a dramatic effect when you lift the stencil.

I used papers and inks from PaperTrey Ink.  Cardstock Scarlet Jewel (shown above) and Olive Twist (below).  Inks were Pure Poppy (lighter) and Scarlet Jewel (darker) for the berries and Olive Twist (lighter) and Ripe Avocado (highlight) for the leaves.


The stamp set has some great sentiments.  I chose "Let Heaven and Nature Sing" for the front. 


Inside the card I used verse Luke 2:10-11

“I bring you good news of great joy that will be for all the people.  For unto you is born this day in the city of David a Savior, who is Christ the Lord” - Luke 2: 10-11

Thanks for stopping by...

Blessings to you this Christmas!

Deb

Saturday, June 13, 2015

Sketch Saturday Challenge #365

Today, Sketch Challenge #365 starts at Sketch Saturday.  Our sponsor this week is Simon Says Stamp with a fabulous $25 gift certificate going to this week's challenge winner.  

Here is Sketch #365
My Interpretation:
Today, I used a retired set from Fun Stampers Journey - Nautical View.  There is a beautiful lighthouse in this set too I hope to use soon.  I also tried out a hot trend using a Tim Holtz burlap stencil and white embossing paste.  A fun technique to add some texture to your project.

Close Up
The arrows are a PTI die cut.  Added a twine knot.  Copic Colors: E31, E33, E35, E37, B000, N1, N3, N5. Cardstock PTI Smokey Shadow, Kraft and Spring Rain.

You can see all the DT inspiration and enter our challenge HERE.  Hope you will join us this week.

Challenges:
Kitty Bee Designs - Masculine
Creative Corner Challenges - Just For Boys
Sister Act Card - Anything Goes
Polkadoodle - Anything Male
Seize the Birthday - Birthday with animal

Thanks for stopping by...
Blessings,
Deb