Showing posts with label TAC Maggie SWIC. Show all posts

Wednesday, December 28, 2011

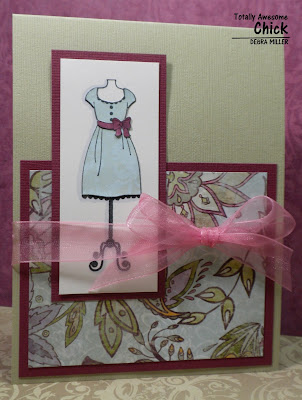
{TAC} Post 6: Sew Lovely

Today, we have our last {Totally Awesome Chicks} design team post.  Red Rubber Designs will be opening in January 2011 and TAC images will be available again - VERY exciting! 

I chose a Nina B set which appeared in the last TAC catalog "Sew Lovely".   I also used TAC Maggie SWIC and cardstock.
The image was stamped on white cardstock, the dress on the blue Maggie cardstock and the bow on the dark pink Maggie cardstock.  I cut the dress and bow out and paper-pieced them on the white cardstock.  I love this technique.

I outlined the image with W-2 gray Copic marker.  The ribbon is also from the Maggie coordinating ribbon.

Be sure to visit all the chicks:

Hope you enjoyed the post and the {TAC} DT while it lasted - I know I did!
Blessings,
Deb

Wednesday, November 9, 2011

{TAC} Post 3: New Creation

Today I'm featuring a project: a covered composition notebook. I have made several of these over the past couple months and they all turned out different. 
I thought this would be a great notebook for bible study, a prayer journal, any purpose really. It has a matching pen and bookmark. I used Maggie SWIC, cardstock and ribbon for this project. The stamp set is TAC New Creation.
I found Pentel brand pens at WalMart. The great thing about these pens is the end of the pen twists off, so patterned paper can be inserted in the barrel. LOVE that.

I covered the front and back covers of the notebook with Maggie light purple cardstock. It was cut to 8" x 12", then I ran it thru my Xyron machine to make it a huge sticker. The inner liner piece is also from Maggie, cut to 9-1/2" x 6-3/4", then ran thru the Xyron machine.
I lined up the cardstock with the edge of the black binding on the notebook for both the front and back. There was about 1" of cardstock hanging over on the 3 sides.

I cut the corner out of the cardstock creating 3 tabs.
Folded the tabs over.

I didn't worry about the rounded corner on the notebook, I made it square and bent over the point, like a hard cover book.
The front cover was straight forward, just added the patterned liner piece on the inside to finish it. The back cover, however, I taped down the ends of the ribbon bookmark and loops (front and back) for the pen first, then added my inner liner.
I stamped the image using Mementos Tuxedo Black ink on Ivory cardstock. I colored it with Copic markers. Before I started, I tested my colors on a scrap piece of ivory paper - YR15, YR21, YR23, YR24, V20, V25, RV63, RV66, RV69, YG93, YG97, YG99.

I added some pastel blue chalk as a background. I went over the whole image, which does give the colored areas a cloudy look. The great thing about chalk is that it is erasable. I did go over the colored areas with an eraser so the colors would be more vibrant. I distressed the image around the edges with Cognac palette ink, then added some Burnt Umber palette ink. This is my favorite distressing/aging technique.

The image is matted with Maggie dark purple, green cardstock.  I added ribbon and a bow (Maggie). The image is attached to the front cover with pop dots.

Supplies -- Stamps: TAC New Creation, Papers: Maggie SWIC and Cardstock, Kraft and Brown Cardstock, Inks: Memento Tuxedo Black, Cognac Palette, Burnt Umber Palette, Pastel Chalks, Copic Markers.

Here are a couple other versions:

TAC God So Loved and TAC Winchester SWIC 
Copic on Kraft cardstock: YR15, YR21, YR23, YR24, E55, E57, E59, V17, V25

Check out what the other chicks are up to today...
Debra Miller <--- You are Here
Christine Pennington (Coordinator)

Hope you have a Fabulous Day!

Blessings,
Deb


Wednesday, October 12, 2011

{TAC} Post 1: Enjoy the Scenery

Hello All,

Today is the first official post for {TAC} Design Team.  I decided to share part of my presentation from Seminar in June 2011.  I shared how to create a background that is not there or fully drawn.  My example was my 2011 catalog cover submission, using TAC Enjoy the Scenery. 

Copic Colors: Path YR21, YR23, YR24; Lettering YR23, YR24
Greenery YG91, YG93, YG95, YG97, Water B000

First, I examined the image looking for clues from the illustrator.  There are some hints.  There is a little squiggle in the front wheel which I took as the edge of the road or at least to suggest direction.  There looks like a lake behind her with the reflections of trees in the water.  So I used a feathering motion to create the trees, water, golden path and grass. I color from light to dark building depth.

Notice I colored right through the lady on the bike.  I did this to make it easier on myself.  I wanted smooth  transitions and complete coverage. She will be paper pieced in a later step.  

Next, I added some sky (light blue chalk) and distressed the edges with Palette Cognac and Burnt Umber ink and a sponge.  This is one of my favorite aging techniques - creates a great vintage look.  Perfect for this image.   

Lastly, I added the lady to the bike. The trickiest part of this was to decide where her skirt ended.  All the parts of the bike near her skirt, pedal and handle bars are part of this extra piece.  I colored her shoe, skirt, gloves, face and hair.  Her coat is also paperpieced (TAC Maggie SWIC).  I've made several of these and sometimes I paperpieced the hat out of the same Maggie cardstock, sometimes it is colored. 

Copic Colors: Face E21, R02 (cheek), Hair E55, E57, E59, Skirt V06, V09, V15, Handle Bars W3, Wheels E59, Shoe and gloves YR21, YR23, YR24 

Front of card - closed
Close up of the image - you can better see where I paperpieced.  There is a natural place to separate the bike and the ladies skirt near the left knee above the fork of the bike.
Surprise!  There is more to this card.  It is an easel card and I continued the road.  You could add a post it note pad in the paths place and create a fun and functional desk top decoration.   More on that idea on the 26th our next {TAC} post.  Part 2 of my seminar presentation in 2 weeks.

I covered a lot of things in my presentation about design, tips and tricks, layouts, sketching, color selection, Copic techniques and "aha moments" from Copic Intermediate certification class I took the day before.  Drop me a note if there is something specific you would like me to blog about.  

Check out the rest of the chicks...

Debra Miller <--- You are Here
Christine Pennington (Coordinator)

Until next time!  Thanks for stopping by...

God's Blessings,
Deb

Tuesday, March 1, 2011

DDH "Dreams" Blog Hop

Happy March!

Today is our 1st Digi Design House (DDH) Dream Team blog hop and the theme is "Follow Your Dreams". 

I used Vintage Garden Labels.  This is a great set - so versatile.  I added the sentiment in Word before printing the image out on Copic paper.


Supplies -- The Angel Company Maggie Soar With It Collection (SWIC), cardstock and ribbon.  Copic Markers: V01, V06, V09; YR21, YR23, YR24; YG93, YG95, YG97

Three mystery Design Team members will be giving away the Cool Chicks set from Digi Design House to a random commenter on their blog post. You have until 6:00PM CST on Thursday, March 3 to comment. At 6:01PM, the number of comments will be tallied, and the random number generator will do its magic to pick the winner. You don't know which team members have the candy, so make sure you comment on EACH stop in the hop. Additionally, all of the names of our faithful (those of you who comment on EVERY stop on the hop) will be put in a hat to draw an additional set! Oh yes, we are giving away FOUR FREE STAMP SETS!

Next stop on our hop Dee's blog.

Hope you enjoy the rest of the hop!
Blessings,
Deb

Full blog hop list...
DDH Home (Start Here)
Christine Pennington - Christine's Digi Designs
You are Here! --->Debra Miller - Cream City Angels 
Dee Pritschet - Dee's Designs
Hannah Clark - Delightfully Distressing Designs
Mandi-Lee Klinger (Guest Designer) - Copic Me
Michelle Single (Coordinator) - Caffeine & Stamps
Nancy Kirk (Guest Designer) - Seaside Creativity
Paula-Kay Bourland - Digi Designs by Paula-Kay
Stephanie Serrano - Stephanie's Stampin Spot
Teresa Jenkins - Mama Pickle's Paper Creations
Tracy Jackson - Stamping Seasons